
A heat press manual is a comprehensive guide detailing setup, operation, and maintenance of heat press machines. It covers temperature settings, pressure adjustment, and using sublimation paper or transfer vinyl. Manuals vary by model, ensuring optimal performance and safety for crafters and professionals alike.
- Essential for beginners and experienced users.
- Covers calibration, troubleshooting, and material compatibility.
- Includes step-by-step instructions for various projects.
- Ensures efficient and safe heat transfer processes.

Understanding Heat Press Components
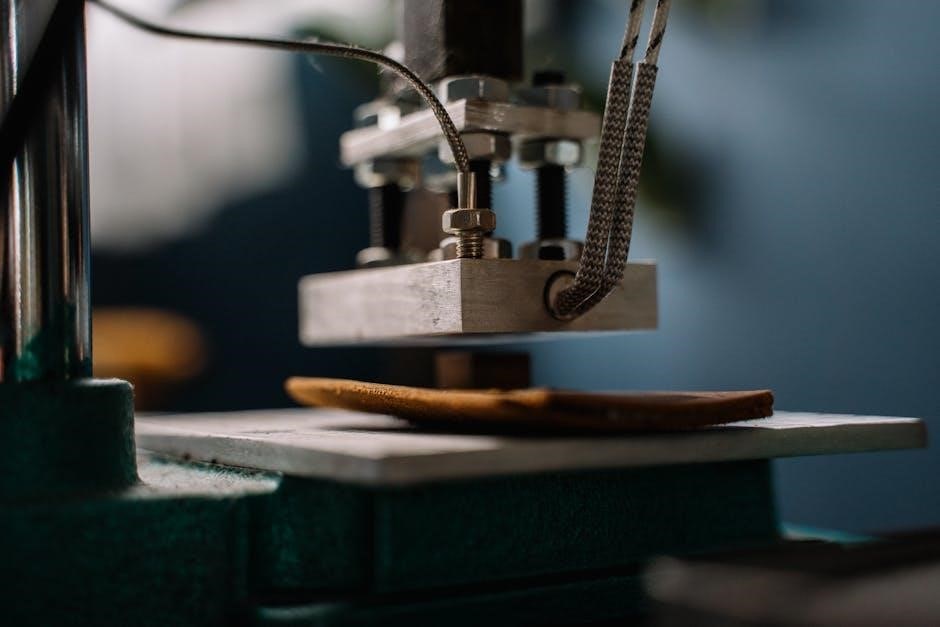
A heat press consists of several key components designed to facilitate efficient heat transfer. The platen press, often Teflon-coated, is the primary surface for placing materials. Mug press attachments are available for curved items like mugs or hats, while the hat/cap press accommodates smaller, rounded surfaces. The temperature control panel allows precise adjustments, typically ranging from 180°F to 400°F, depending on the material. Pressure adjustment knobs enable customization of force applied during pressing, crucial for even transfer. Additional features may include a digital display for monitoring temperature and time, ensuring accuracy. Understanding these components is essential for optimal performance and safety. Proper calibration and maintenance of these parts extend the machine’s lifespan and ensure consistent results in sublimation, vinyl transfer, and other heat-related projects.
- Platen Press: Main heat transfer surface, often Teflon-coated for durability.
- Mug Press: Designed for curved items like mugs.
- Hat/Cap Press: Accommodates smaller, rounded surfaces.
- Temperature Control: Adjusts heat settings for specific materials.
- Pressure Knob: Customizes pressure for even transfer.
Setting Up Your Heat Press
Setting up your heat press involves a few straightforward steps to ensure optimal performance. Begin by carefully unboxing and placing the machine on a stable, heat-resistant surface in a well-ventilated area. For platen presses, attach the Teflon-coated platen and ensure it is securely locked. If using a mug or hat press, align the additional attachments according to the manufacturer’s instructions.
Plug in the machine and allow it to preheat to the recommended temperature, typically between 180°F and 400°F, depending on the material. Adjust the pressure knob to the desired setting, ensuring even pressure distribution. For digital models, use the control panel to set temperature, time, and pressure. Some models, like the MakerBliss Auto Heat Press, offer auto-pressure adjustment for convenience.
- Place the machine on a stable, heat-resistant surface.
- Attach platen or additional press attachments as needed.
- Preheat to the desired temperature and adjust pressure.
- Test settings on scrap material before use.
Always refer to the specific manual for your model, as setup may vary slightly for machines like Hotronix or Secabo presses. Proper setup ensures safe operation and consistent results for sublimation, vinyl transfers, and other projects.
Operating the Heat Press
Operating a heat press involves a series of precise steps to ensure successful transfers. Begin by preheating the machine to the recommended temperature, typically between 180°F and 400°F, depending on the material being used. For sublimation, vinyl, or other transfers, place the prepared design face-down on the platen or attached press (e.g., mug or hat press).
Set the timer according to the material’s requirements, usually ranging from 10 to 300 seconds. Adjust the pressure knob to ensure even contact between the heat platen and the material. For digital models, use the control panel to input temperature, time, and pressure settings. Some models, like the MakerBliss Auto Heat Press, automatically adjust pressure, simplifying the process.
- Preheat the press to the desired temperature.
- Place the material with the design centered on the platen.
- Close the press and start the timer.
- Allow the machine to complete the cycle.
- Open the press carefully and let the material cool before handling.
Always use heat-resistant gloves to avoid burns. Refer to your specific heat press manual for model-specific instructions, as operating procedures may vary slightly for machines like Hotronix or Secabo presses.
Temperature and Pressure Adjustment
Adjusting the temperature and pressure on a heat press is crucial for achieving optimal results. Begin by consulting the user manual to find the recommended settings for your specific material, such as sublimation paper or heat transfer vinyl. Typically, temperatures range from 180°F to 400°F, depending on the material’s requirements.
For pressure adjustment, use the pressure knob to ensure even contact between the heat platen and the material. Thicker materials may require higher pressure, while thinner ones need less. Calibrate the pressure by placing a piece of paper on the platen and adjusting the knob until it feels firm but not overly tight.
- Start with the manufacturer’s recommended settings.
- Test settings on scrap material before applying them to your final project.
- Adjust temperature and pressure in small increments based on test results.
- Use protective gear like gloves when handling hot materials.
By following these guidelines and practicing with different materials, you’ll develop a sense of the ideal temperature and pressure settings for various projects.
Using Sublimation Paper and Transfer Vinyl
Sublimation paper and transfer vinyl are essential materials for heat press projects. Sublimation paper is used to transfer vibrant, full-color designs onto materials like ceramics, fabric, and metal, while transfer vinyl is ideal for cutting and layering designs for textiles and signage.
For sublimation paper, print your design using a sublimation printer and ink. Mirror the image if necessary, depending on the press type. Place the paper on the material, ensuring proper alignment. Apply heat and pressure according to the manufacturer’s settings (typically 180-200°F for 3-5 minutes). After pressing, allow the material to cool before handling.
For transfer vinyl, cut your design using a vinyl cutter or craft knife. Weed the excess vinyl, leaving only the desired design. Place the vinyl on the material, cover with a heat-resistant sheet, and press at 280-300°F for 10-15 seconds. Peel the carrier sheet while warm for a smooth finish.
- Always pre-test a small sample to ensure compatibility and optimal results.
- Use a lint roller to remove dust and debris before pressing.
- For double-sided prints, insert cardboard to prevent re-heating the first transfer.
Proper use of these materials ensures professional-quality results in your heat press projects.
Troubleshooting Common Issues
Encountering issues with your heat press? Common problems often relate to temperature, pressure, or material incompatibility. If designs are not transferring properly, check that the temperature and pressure settings match the manufacturer’s recommendations for your specific materials;
- Uneven Pressure: Ensure the platens are evenly aligned and tightened. If pressure is insufficient, adjust the knob or perform a calibration.
- Incorrect Temperature: Verify the temperature gauge for accuracy. Use a thermometer to cross-check settings, especially for sublimation paper or transfer vinyl.
- Ghosting or Blurry Images: This occurs from insufficient pressure or over-heating. Lower the temperature and increase pressure slightly;
- Material Scorching: Reduce the temperature or shorten the press time. Test on a scrap material first.
- Vinyl Not Weeding Properly: Ensure the blade depth and force are correctly set during cutting. Use a lint roller to remove excess vinyl.
For persistent issues, consult your heat press manual or contact customer support. Regular maintenance, such as cleaning the platens and calibrating the machine, can prevent many common problems.
Maintenance and Care
Regular maintenance is crucial to extend the life and performance of your heat press. Start by cleaning the platens with a soft cloth and mild detergent after each use to prevent ink and debris buildup. Avoid abrasive cleaners that could damage the non-stick coating.
- Lubricate Moving Parts: Apply silicone-based lubricant to hinges and springs to ensure smooth operation and prevent rust.
- Check and Replace Pads: Inspect the heat-resistant pads for wear or damage. Replace them if necessary to maintain even heat distribution.
- Clean the Heat Element: Use a damp cloth to wipe away any residue from the heating element. Never submerge electrical components in water.
- Store Properly: Keep the heat press in a dry, cool place when not in use. Cover it to protect from dust.
- Check Sensors and Cables: Ensure all connections are secure and sensors are functioning correctly for accurate temperature and pressure control.
Performing these maintenance tasks regularly will ensure your heat press operates efficiently and consistently. Refer to your manual for model-specific care instructions.
Popular Heat Press Models
The market offers a variety of heat press models catering to different needs, from hobbyists to professionals. Popular choices include the Vevor Heat Press, known for its durability and user-friendly interface, and the MakerBliss Auto Heat Press, which simplifies transfers with automatic pressure adjustment.
- Vevor Heat Press: A versatile option with digital controls, ideal for sublimation and vinyl transfers.
- MakerBliss Auto Heat Press: Features automatic pressure adjustment and presets for common materials.
- Hotronix Heat Press: Renowned for its robust construction and precise temperature control.
- Secabo Heat Press: Offers advanced features like touch-screen operation and multiple platen sizes.
- HTVRONT Heat Press: A budget-friendly option with excellent performance for crafting projects.
These models are widely praised for their reliability and versatility, making them top choices for heat transfer applications; Each model comes with detailed manuals to guide users through setup, operation, and maintenance.
Calibration and Optimization
Calibration and optimization are crucial steps to ensure your heat press performs at its best. Start by setting the temperature accurately, typically between 180°F to 200°F, depending on the material. Use a temperature gun to verify the platen’s heat distribution. Next, adjust the pressure by turning the knob counterclockwise to lower or clockwise to increase it. Place a sheet of paper on the platen and tighten the knob to test even pressure distribution.
- Refer to the manufacturer’s instructions for specific calibration steps.
- Ensure the machine is preheated before use for consistent results.
- Regularly check and align the platens to prevent uneven pressure.
- Optimize settings based on the type of transfer material, such as sublimation paper or vinyl.
Proper calibration ensures precise temperature and pressure control, while optimization fine-tunes these settings for specific projects, enhancing overall efficiency and output quality. Always consult your heat press manual for model-specific guidance.
Heat Press Safety Precautions
Operating a heat press requires careful attention to safety to avoid accidents and ensure optimal performance. Always wear protective gloves and safety glasses when handling hot surfaces or materials. Keep children and pets away from the machine while it is in use. Never touch the heated platen or press surfaces with bare hands, as they can cause severe burns. Ensure the machine is placed on a stable, heat-resistant surface to prevent tipping or damage.
- Turn off the heat press when not in use to avoid overheating or electrical issues.
- Use the correct power supply voltage recommended by the manufacturer to prevent malfunctions.
- Keep the workspace well-ventilated to avoid inhaling fumes from sublimation inks or vinyl.
- Avoid pressing wet or damp materials, as they can cause steam burns or damage the machine.
Regularly inspect the machine for worn or damaged parts and follow the manufacturer’s maintenance guidelines. Always unplug the heat press before cleaning or performing repairs. By following these safety precautions, you can ensure a safe and efficient heat transfer process for all your projects.
- Visit manufacturer websites for downloadable PDF manuals.
- Check out tutorials and FAQs for troubleshooting common issues.
- Join heat press communities for tips and inspiration.
With this knowledge, you’re ready to unlock the full potential of your heat press and create stunning designs with confidence!